It's Christmas eve eve. And my first day off work in what feels like about a fortnight (it's not, I just like to exaggerate). So what better day to spend a day off than shopping, and getting your nails done? When getting extensions, I get the lovely nail ladies to leave my tips plain, so I can paint them myself. I have a big enough nail polish collection, I might as well make the most of it. I'm also a control freak - they'd only do it wrong! I'll show you what I bought today, at some point. Most of it was boring stuff - tights, white vest tops (they stop your tights falling down, it's magic), face wipes and dry shampoo. I did get some rather nice bits from New Look - hey, I get staff discount, what can I say - so expect a post on them soooon. But back to the nails - here's the result of a day off and therefore an awful lot of free time.
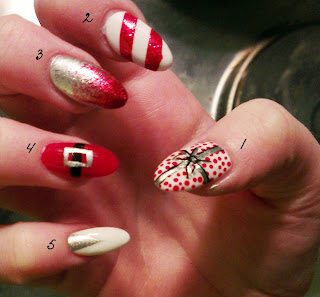
1) To do the dots you just need a dotting tool (I use a hair grip cause I'm cheap), and a reeeally fine brush. White, dots, 5 minutes to dry a bit, silver, black outlines.
2) This really should have been neater. It's a tape mani, so you just paint on your base colour, wait til it's completely 100% dry, tape off the sections you don't want to paint and then paint over the tape. For a better guide than that poor attempt, try
here.
3) Gradient glitter! I love it ridiculous amounts. Paint your base on, then three lots of glitter polish. Make sure the glitter brush is almost clean, then paint from the top downwards, to about halfway down the nail. When dry, repeat to about two thirds down, and then finish off the top quarter.
4) This is quite clearly Santa's belt, okay guys? I should have done it with tape but I'm lazy,so it's a bit messy. It was all freehanded.
5) Another tape one here - just cut a little triangle out, and use the bit you cut it out of to block off the majority of the nail.
I'm in love with them, seriously.


